I had been working on how to create membership rule into query based collection using SCCM SDK with C#. The article from MSDN has limited information especially in this area using C#. What I have found mostly are done using PowerShell script. Luckily, PowerShell and C# are somehow similar and I am able to base on the sample to convert it to the C# code to perform the automation work that I want. I am going to share the detail in my today's post.
adminui.wqlqueryengine.dll
Microsoft.ConfigurationManagement.ManagementProvider.dll
Both DLLs can be obtained from SCCM installed directory which default at C:\Program Files\ConfigMgr2012\bin
If you download the SCCM 2012 SDK from this Microsoft Download Center link, it does not include the Microsoft.ConfigurationManagement.ManagementProvider.dll. The sample code provided from the SDK does not work as it miss out this dll. So, you have to get it from the SCCM 2012 server.


I am going to add multiple users into a rule, so select Criterion Type as List of values. Then, click the Select button.
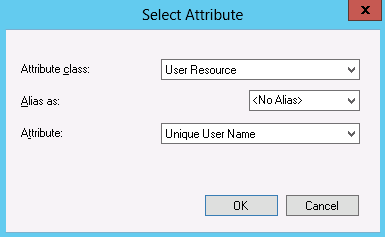
In my environment, I use Unique User Name to identify the users. Therefore, select Unique User Name as the attribute.
After clicking the OK button, it will lead me back to Criterion Properties page. Then, type the unique user name into the Value to add textbox or click the Values button to select the user that you want to add them into the membership rule. Once you have done adding all the users into the list, click the OK button.

The query is displayed in the Query Statement page. That query is going to be needed to be added to the SCCM query based collection programmatically later.
That's all. Happy coding!
Pre-requisite
Before we can begin, we need to include the following DLLs into your project assembly reference.adminui.wqlqueryengine.dll
Microsoft.ConfigurationManagement.ManagementProvider.dll
Both DLLs can be obtained from SCCM installed directory which default at C:\Program Files\ConfigMgr2012\bin
If you download the SCCM 2012 SDK from this Microsoft Download Center link, it does not include the Microsoft.ConfigurationManagement.ManagementProvider.dll. The sample code provided from the SDK does not work as it miss out this dll. So, you have to get it from the SCCM 2012 server.
Query
Basically what we want to achieve here is to add multiple users into a membership rule then add the rule into the SCCM query based collection. Instead of manually doing it, we are going to automate it. First, we need to identify how the query should look like which to be added into SCCM collection.
We can check it out by opening the Configuration Manager Console. Then, go to the SCCM collection page. Open the Collection Properties.

Click the Add Rule button, then select Query Rule.


Enter a name for the query, then click Edit Query Statement.
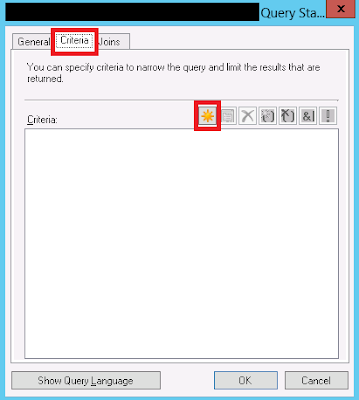
Choose Criteria tab then click the little sun button.

I am going to add multiple users into a rule, so select Criterion Type as List of values. Then, click the Select button.

In my environment, I use Unique User Name to identify the users. Therefore, select Unique User Name as the attribute.
After clicking the OK button, it will lead me back to Criterion Properties page. Then, type the unique user name into the Value to add textbox or click the Values button to select the user that you want to add them into the membership rule. Once you have done adding all the users into the list, click the OK button.

The query is displayed in the Query Statement page. That query is going to be needed to be added to the SCCM query based collection programmatically later.
Coding
Add Membership To Collection
The following are the source code to add the query to membership rule to SCCM collection.
The semantic flow is as follow:
1. Connect to SCCM server.
2. Form the WQL query as you have seen from the Configuration Manager Console.
3. Validate the WQL query.
4. Create a new collection query instance.
5. Invoke AddMembershipRule method.
6. Request collection membership refresh.
public void
AddUsersToCollectionMembership(string
sccmCollectionID, params string[]
userNames)
{
SmsNamedValuesDictionary
namedValues = new SmsNamedValuesDictionary();
WqlConnectionManager
connectionManager = new WqlConnectionManager(namedValues);
if
(string.IsNullOrWhiteSpace(sccmCollectionID) ||
userNames == null)
throw new ArgumentException("The
parameter collectionID value cannot be null or empty or whitespace.");
try
{
connectionManager.Connect(this.SccmServerName);
WqlResultObject
collection = (WqlResultObject)connectionManager.GetInstance("SMS_Collection.CollectionID='"
+ sccmCollectionID + "'");
string[]
users = userNames.Select(x => x.Replace("\\",
"\\\\")).ToArray();
string
query = string.Format("SELECT *
" +
"FROM
SMS_R_User " +
"WHERE
SMS_R_User.UniqueUserName IN ({0})", string.Join(",",
users));
//Validate the query before
adding the query to SCCM collection
var
validateQueryParam = new Dictionary<string,
object>();
validateQueryParam.Add("WQLQuery",
query);
IResultObject
validationResult = connectionManager.ExecuteMethod("SMS_CollectionRuleQuery",
"ValidateQuery",
validateQueryParam);
if
(validationResult["ReturnValue"].BooleanValue
== true)
{
//Create collection
rule query instance
IResultObject
rule = connectionManager.CreateInstance("SMS_CollectionRuleQuery");
rule["QueryExpression"].StringValue
= query;
rule["RuleName"].StringValue
= "Members of collection "
+ sccmCollectionID;
//Add the rule into
a parameter object
var
membershipRuleParam = new Dictionary<string,
object>();
membershipRuleParam.Add("collectionRule",
rule);
//Add new rule to
SCCM collection
IResultObject
addResult = collection.ExecuteMethod("AddMembershipRule",
membershipRuleParam);
//NOTE: The added
rule will have an ID return. You need to store it somewhere, e.g: database
//You need this
query ID to delete this rule later
int
sccmQueryID = addResult["QueryID"].IntegerValue;
if
(addResult["ReturnValue"].IntegerValue
!= 0)
{
Debug.WriteLine("Failed
to add membership rule to SCCM Collection.");
throw new ApplicationException("Failed
to add membership rule to SCCM Collection.");
}
//Refresh the SCCM
collection membership
Dictionary<string,
object> requestRefreshParameters = new Dictionary<string,
object>();
requestRefreshParameters.Add("IncludeSubCollections",
false);
collection.ExecuteMethod("RequestRefresh",
requestRefreshParameters);
}
else
{
Debug.WriteLine(string.Format("Invalid
WQL query: ", query));
throw new ApplicationException(string.Format("Invalid
WQL query: ", query));
}
}
catch
(SmsException smsEx)
{
Debug.WriteLine("Failed
to run queries. Error: " + smsEx.Details);
throw;
}
catch
(UnauthorizedAccessException accessEx)
{
Debug.WriteLine("Failed
to authenticate. Error:" + accessEx.Message);
throw;
}
finally
{
connectionManager.Close();
connectionManager.Dispose();
}
}
Delete Membership From Collection
Similar concept in adding membership to collection. One thing to take note is the SCCM Query ID to be passed to the DeleteMembershipRule method.
The SCCM Query ID was obtained during AddMembershipRule method from above code (highlighted yellow).
public void
DeleteSccmCollectionRule(string sccmCollectionID, int
sccmQueryID)
{
SmsNamedValuesDictionary
namedValues = new SmsNamedValuesDictionary();
WqlConnectionManager
connectionManager = new WqlConnectionManager(namedValues);
if
(string.IsNullOrWhiteSpace(sccmCollectionID))
throw new ArgumentException("The
parameter collectionID value cannot be null or empty or whitespace.");
try
{
connectionManager.Connect(this.SccmServerName);
WqlResultObject
collection = (WqlResultObject)connectionManager.GetInstance("SMS_Collection.CollectionID='"
+ sccmCollectionID + "'");
//Create collection rule
query instance
IResultObject
rule = connectionManager.CreateInstance("SMS_CollectionRuleQuery");
rule["QueryID"].IntegerValue
= sccmQueryID;
//Add the rule into a
parameter object
var
membershipRuleParam = new Dictionary<string,
object>();
membershipRuleParam.Add("collectionRule",
rule);
//Delete existing rule from
SCCM collection
IResultObject
deleteResult = collection.ExecuteMethod("DeleteMembershipRule",
membershipRuleParam);
if
(deleteResult["ReturnValue"].IntegerValue
!= 0)
{
Debug.WriteLine("Failed to
delete membership rule from SCCM Collection.");
throw new ApplicationException("Failed
to delete membership rule from SCCM Collection.");
}
//Refresh the SCCM collection
membership
Dictionary<string,
object> requestRefreshParameters = new Dictionary<string,
object>();
requestRefreshParameters.Add("IncludeSubCollections",
false);
collection.ExecuteMethod("RequestRefresh",
requestRefreshParameters);
}
catch
(SmsException smsEx)
{
Debug.WriteLine("Failed
to run queries. Error: " + smsEx.Details);
throw;
}
catch
(UnauthorizedAccessException accessEx)
{
Debug.WriteLine("Failed
to authenticate. Error:" + accessEx.Message);
throw;
}
finally
{
connectionManager.Close();
connectionManager.Dispose();
}
}
That's all. Happy coding!


