Blockchain becoming a hot topic recently as I find that it is a good technology to form trust between businesses whereby the data are being distributed and governed by the stakeholders together but still the data are temper proof which demonstrate reliability and security.
Quorum is an Ethereum-based blockchain technology which had removed the mining and gas fee requirement for deploying and executing smart contract. Quorum is being designed to share data and contracts within a closed group or known as consortium chain. We can control the accessibility of the blockchain network to desire parties only.
There are 3 types of consensus algorithm available to setup in Quorum blockchain:
Let's start with how to setup your own Quorum nodes in Raft consensus algorithm first. I will cover the other 2 consensus implementation next time when I am free. For more information about those consensus algorithms mentioned above, you may find them in the Quorum official documentation site here.

If you have not install Git, you need to install it now as we need it to clone Quorum code.

After you have created an account for every 4 different nodes, we shall proceed to create a general genesis setting file which will be shared with all the nodes. Therefore, create a new file call genesis.json at the /mnt path by executing the following command:

Save the genesis.json then quit the editor.
Now, create node key for every node by executing the following command:

Quorum is an Ethereum-based blockchain technology which had removed the mining and gas fee requirement for deploying and executing smart contract. Quorum is being designed to share data and contracts within a closed group or known as consortium chain. We can control the accessibility of the blockchain network to desire parties only.
There are 3 types of consensus algorithm available to setup in Quorum blockchain:
- Raft-based Consensus: A consensus model for faster blocktimes, transaction finality, and on-demand block creation.
- Istanbul BFT (Byzantine Fault Tolerance) Consensus: A PBFT-inspired consensus algorithm with immediate transaction finality, by AMIS.
- Clique POA Consensus: a default POA consensus algorithm bundled with Go Ethereum.
Let's start with how to setup your own Quorum nodes in Raft consensus algorithm first. I will cover the other 2 consensus implementation next time when I am free. For more information about those consensus algorithms mentioned above, you may find them in the Quorum official documentation site here.
Choosing the Right Spec of Your ECS Instance for Quorum Testing
In order to do quick start with Quorum, the minimum number of required nodes is 4. However, we do not need to purchase 4 ECS, but 1 will do the trick for testing and development purpose. I would recommend the following Alibaba Cloud ECS spec:

In order to minimize the cost spent on learning, I like the Pay As You Go feature in Alibaba Cloud whereby you only be charged base on the resource that you actually used. The Entry Level (Shared) category server give us even lower cost solution especially for our development and testing server which most of the time is idle. If the server CPU exceed the average baseline CPU performance, then only we will be charged for CPU credit. For more info how burstable type instance work, please refer to this link.
So, one server with 2 CPU and 4GB of RAM is sufficient to deploy 4 nodes for testing, please refer to the details in the following article. As for the operating system, I would recommend Ubuntu 18.04 64-bit. Then, add a 20GB data disk to keep the Quorum data instead of system disk.
Setting Up Environment
After you have provisioned your server, we need to install the Quorum dependency which is Go language first by running the following command.
sudo apt install golangBy default, the server data disk is not mount yet. We need to mount it first. Please refer to this post. Then, we will setup the Quorum node in the data disk mount instead of system disk.
If you have not install Git, you need to install it now as we need it to clone Quorum code.
sudo apt install git
Clone from Github
Now, change the directory to the data disk path at /mnt. Then, begin with cloning and downloading the latest source code from the git by following command:

git clone https://github.com/jpmorganchase/quorum.gitEnsure that PATH contains geth and bootnode.
cd quorum
make all
export PATH=/mnt/quorum/build/bin:$PATH

Create Folder for Each Node
Create 4 folders at the /mnt data disk path by running the following command:
mkdir node1
mkdir node2
mkdir node3
mkdir node4
Initialize Node
Initialize the node with new account for every node by running the following command from the node folder:
cd /mnt/node1
geth --datadir node1 account new
cd /mnt/node2
geth --datadir node2 account new
cd /mnt/node3
geth --datadir node3 account new
cd /mnt/node4When you run the account new command, you will be prompted with asking for entering the password for the new account. Upon successful account creation, you will be given an account address which belong to the new account. You need to take note and keep it safely along with the password.
geth --datadir node4 account new

After you have created an account for every 4 different nodes, we shall proceed to create a general genesis setting file which will be shared with all the nodes. Therefore, create a new file call genesis.json at the /mnt path by executing the following command:
vi /mnt/genesis.jsonThe genesis.json file can be downloaded from here from the Quorum website. Copy and paste the content to the file editor, then edit the setting accordingly to below:
{
  "alloc": {
    "0x<account address created from node1>": {
      "balance": "1000000000000000000000000000"
    },
    "0x<account address created from node2>": {      "balance": "1000000000000000000000000000"
    },
    "0x<account address created from node3>": {      "balance": "1000000000000000000000000000"
    },
    "0x<account address created from node4>": {      "balance": "1000000000000000000000000000"
    }
  },
  "coinbase": "0x0000000000000000000000000000000000000000",
  "config": {
    "homesteadBlock": 0,
    "byzantiumBlock": 0,
    "constantinopleBlock": 0,
    "chainId": 10,
    "eip150Block": 0,
    "eip155Block": 0,
    "eip150Hash": "0x0000000000000000000000000000000000000000000000000000000000000000",
    "eip158Block": 0,
    "maxCodeSize": 35,
    "maxCodeSizeChangeBlock" : 0,
    "isQuorum": true
  },
  "difficulty": "0x0",
  "extraData": "0x0000000000000000000000000000000000000000000000000000000000000000",
  "gasLimit": "0xE0000000",
  "mixhash": "0x00000000000000000000000000000000000000647572616c65787365646c6578",
  "nonce": "0x0",
  "parentHash": "0x0000000000000000000000000000000000000000000000000000000000000000",
  "timestamp": "0x00"
}

Save the genesis.json then quit the editor.
Now, create node key for every node by executing the following command:
bootnode --genkey=nodekey1
bootnode --genkey=nodekey2
bootnode --genkey=nodekey3
bootnode --genkey=nodekey4

Then, move the node key to the node folder:

Now, we need to get the enode id of the new node for the next setup. The --nodekey parameter is the path of the nodekey that you had moved from the previous step.


Save the static-nodes.json then copy the file to every node directory:

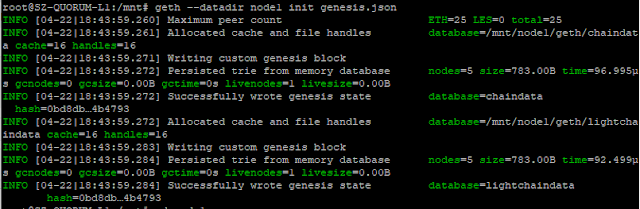
Now, we can begin to initialize the first node and create the genesis block by issuing following command:
We need to prepare a automated script to start the node by creating a new file call startnode1.sh by executing following command:
Repeat above step to create startnode2.sh, startnode3.sh and startnode4.sh. There are a few parameters you need to take note and modify accordingly:
--datadir #your node folder which is node1, node2, node3 and node4
--networkid #need to be consistent for one blockchain one networkid
--raftport #follow as you setup in the static-nodes.json
--rpcport #shall be unique for each node in order to prevent port conflict
--port #follow as you setup in the static-nodes.json


Once done, grant execution privilege to the startnode scripts:

Next, attach the geth process by executing the following process:

The node1 is active now, but not the other 3. Since I can confirm that the node is working fine, I shall proceed to make the other 3 nodes online as well by finishing what's left out which is the run geth on the other 3 nodes.

Finally, start the other 3 nodes by executing the startnode2.sh, startnode3.sh and startnode4.sh.
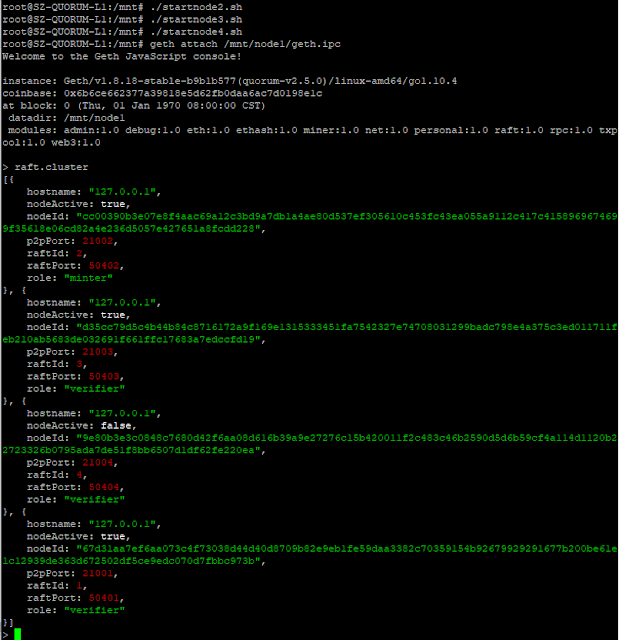
As you can see, all 4 nodes are in active status now. The Quorum installation and deployment is considered as complete.
mv nodekey1 node1/nodekey
mv nodekey2 node2/nodekey
mv nodekey3 node3/nodekey
mv nodekey4 node4/nodekey

Now, we need to get the enode id of the new node for the next setup. The --nodekey parameter is the path of the nodekey that you had moved from the previous step.
bootnode --nodekey=node1/nodekey --writeaddress
bootnode --nodekey=node2/nodekey --writeaddress
bootnode --nodekey=node3/nodekey --writeaddress
bootnode --nodekey=node4/nodekey --writeaddress

Copy down the enode id of every nodekey above. Then, create a new file call static-nodes.json using file editor:
vi /mnt/static-nodes.jsonThen, either copy the file content below or download from the Quorum website here:
[
  "enode://<node1 nodekey>@127.0.0.1:21001?discport=0&raftport=50401",
  "enode://<node2 nodekey>@127.0.0.1:21002?discport=0&raftport=50402",
  "enode://<node3 nodekey>@127.0.0.1:21003?discport=0&raftport=50403",
  "enode://<node4 nodekey>@127.0.0.1:21004?discport=0&raftport=50404"
]

Save the static-nodes.json then copy the file to every node directory:
cp static-nodes.json /mnt/node1
cp static-nodes.json /mnt/node2
cp static-nodes.json /mnt/node3
cp static-nodes.json /mnt/node4

Now, we can begin to initialize the first node and create the genesis block by issuing following command:
geth --datadir node1 init genesis.json

We need to prepare a automated script to start the node by creating a new file call startnode1.sh by executing following command:
vi /mnt/startnode1.shCopy the following content to the startnode1.sh script.
#!/bin/bash
PRIVATE_CONFIG=ignore nohup geth --datadir node1 --nodiscover --verbosity 5 --networkid 33333 --raft --raftport 50401 --rpc --rpcaddr 0.0.0.0 --rpcport 22001 --rpcapi admin,db,eth,debug,miner,net,shh,txpool,personal,web3,quorum,raft --emitcheckpoints --port 21001 >> node1.log 2>&1 &

$ chmod +x startnode1.sh
$ ./startnode1.sh
Repeat above step to create startnode2.sh, startnode3.sh and startnode4.sh. There are a few parameters you need to take note and modify accordingly:
--datadir #your node folder which is node1, node2, node3 and node4
--networkid #need to be consistent for one blockchain one networkid
--raftport #follow as you setup in the static-nodes.json
--rpcport #shall be unique for each node in order to prevent port conflict
--port #follow as you setup in the static-nodes.json


Once done, grant execution privilege to the startnode scripts:
chmod +x startnode1.shNow, execute all the start nodes script:
chmod +x startnode2.sh
chmod +x startnode3.sh
chmod +x startnode4.sh
./mnt/node1/startnode1.shUpon executing the script, you can verify whether the script is running fine or not by checking if there is a geth.ipc file exist in the node folder.
./mnt/node2/startnode2.sh
./mnt/node3/startnode3.sh
./mnt/node4/startnode4.sh

Next, attach the geth process by executing the following process:
geth attach /mnt/node1/geth.ipcThen, enter the command raft.cluster to check the other node statuses.

The node1 is active now, but not the other 3. Since I can confirm that the node is working fine, I shall proceed to make the other 3 nodes online as well by finishing what's left out which is the run geth on the other 3 nodes.

Finally, start the other 3 nodes by executing the startnode2.sh, startnode3.sh and startnode4.sh.

As you can see, all 4 nodes are in active status now. The Quorum installation and deployment is considered as complete.


No comments:
Post a Comment