Continue from the previous blog post about setting up Quorum node on Alibaba Cloud ECS instance, there is an optional module available for us to protect our transaction data privacy by limiting the data being exposed to certain authorized nodes.
Tessera is an independent software developed using Java and what it does is to perform data encryption for transaction dedicated to authorized nodes, and this software is sitting on top of Quorum node. The following diagram explain well how it perform the data encryption and decryption of the transaction:

As you can see Node A and B are in the same context but not Node C. When there is a transaction data being fed into the Node A, the transaction being encrypted and save the data into the private store.
The Node B Tessera is being configured to recognized Node A Tessera, and both share the same encryption key so that the authorized nodes manage to encrypt and decrypt the private store data.
So, today we are going to setup Node 1 and Node 2 to have Tessera protect their transaction privacy from the Quorum blockchain that I had setup from the previous post.

Alternatively, you can also download the installation file manually at https://github.com/jpmorganchase/tessera/releases
Next, go to the mounted data disk directory, make directory for 4 nodes.

Then, move the Tessera software to the /mnt path, then execute the following command to create the key sets.

Now, move the key files to the node1t and node2t folder:

Create a file call config.json, then copy and paste the follow content to the config file:
{
"useWhiteList": false,
"jdbc": {
"username": "sa",
"password": "",
"url": "jdbc:h2:/mnt/node1t/db;MODE=Oracle;TRACE_LEVEL_SYSTEM_OUT=0",
"autoCreateTables": true
},
"serverConfigs":[
{
"app":"ThirdParty",
"enabled": true,
"serverAddress": "http://localhost:9081",
"communicationType" : "REST"
},
{
"app":"Q2T",
"enabled": true,
"serverAddress":"unix:/mnt/node1t/tm.ipc",
"communicationType" : "REST"
},
{
"app":"P2P",
"enabled": true,
"serverAddress":"http://localhost:9001",
"sslConfig": {
"tls": "OFF"
},
"communicationType" : "REST"
}
],
"peer": [
{
"url": "http://localhost:9001"
},
{
"url": "http://localhost:9002"
},
{
"url": "http://localhost:9003"
},
{
"url": "http://localhost:9004"
}
],
"keys": {
"passwords": [],
"keyData": [
{
"privateKeyPath": "/mnt/node1t/t1.key",
"publicKeyPath": "/mnt/node1t/t1.pub"
}
]
},
"alwaysSendTo": []
}
Save the file, then exit. Then, execute the following command to kick start the Tessera process:

When you see the tm.ipc file is exist in the node1t folder, it indicate that you have done it correctly and the Tessera process is running now. If you do not see, not to worry, wait for a few more seconds, or check the tessera.log file to see what went wrong.
Repeat the above config file creation step for the node2t, refer to the color highlighted value that need to be modified accordingly to the right node config.
Now, go to your data disk mount directory which is located at /mnt, open the file startnode1.sh with file editor, then modify the PRIVATE_CONFIG value to the Tessera ipc file path.

To:

After modifying and saving the startnode1.sh and startnode2.sh, straight away execute both scripts.

Then, go to the /mnt directory, create a test sample smart contract called private-contract.js, then copy and paste the following content to the new file, but remember to change the value for privateFor to your node 2 Tessera public key which you got it from previous step:
a = eth.accounts[0]
web3.eth.defaultAccount = a;
// abi and bytecode generated from simplestorage.sol:
// > solcjs --bin --abi simplestorage.sol
var abi = [{"constant":true,"inputs":[],"name":"storedData","outputs":[{"name":"","type":"uint256"}],"payable":false,"type":"function"},{"constant":false,"inputs":[{"name":"x","type":"uint256"}],"name":"set","outputs":[],"payable":false,"type":"function"},{"constant":true,"inputs":[],"name":"get","outputs":[{"name":"retVal","type":"uint256"}],"payable":false,"type":"function"},{"inputs":[{"name":"initVal","type":"uint256"}],"payable":false,"type":"constructor"}];
var bytecode = "0x6060604052341561000f57600080fd5b604051602080610149833981016040528080519060200190919050505b806000819055505b505b610104806100456000396000f30060606040526000357c0100000000000000000000000000000000000000000000000000000000900463ffffffff1680632a1afcd914605157806360fe47b11460775780636d4ce63c146097575b600080fd5b3415605b57600080fd5b606160bd565b6040518082815260200191505060405180910390f35b3415608157600080fd5b6095600480803590602001909190505060c3565b005b341560a157600080fd5b60a760ce565b6040518082815260200191505060405180910390f35b60005481565b806000819055505b50565b6000805490505b905600a165627a7a72305820d5851baab720bba574474de3d09dbeaabc674a15f4dd93b974908476542c23f00029";
var simpleContract = web3.eth.contract(abi);
var simple = simpleContract.new(42, {from:web3.eth.accounts[0], data: bytecode, gas: 0x47b760, privateFor: ["83vHGB2IGbmObH8Dl/tHWadA5KUQ3u7DxIs2byOuiQU="]}, function(e, contract) {
if (e) {
console.log("err creating contract", e);
} else {
if (!contract.address) {
console.log("Contract transaction send: TransactionHash: " + contract.transactionHash + " waiting to be mined...");
} else {
console.log("Contract mined! Address: " + contract.address);
console.log(contract);
}
}
});
Once done, save and exit from the file editor.
Now, attach geth to the Node 1 by executing the following command:
Once you have unlocked your account, load the private contract script by issuing following geth command:

Up to this stage, you are considered as successfully setup Tessera in your Quorum. However, we need a block explorer to further visualize how your blockchain work. In my next post, I will share how to setup a Quorum block explorer. Stay tuned!
Tessera is an independent software developed using Java and what it does is to perform data encryption for transaction dedicated to authorized nodes, and this software is sitting on top of Quorum node. The following diagram explain well how it perform the data encryption and decryption of the transaction:

As you can see Node A and B are in the same context but not Node C. When there is a transaction data being fed into the Node A, the transaction being encrypted and save the data into the private store.
The Node B Tessera is being configured to recognized Node A Tessera, and both share the same encryption key so that the authorized nodes manage to encrypt and decrypt the private store data.
So, today we are going to setup Node 1 and Node 2 to have Tessera protect their transaction privacy from the Quorum blockchain that I had setup from the previous post.
Environment
As mentioned earlier, Tessara is developed using Java, therefore, we need to make sure our node is installed with JDK 11 or latest by executing the following command:
sudo apt install openjdk-11-jre-headless
Installation
First, download Tessera installation file by executing the following command:
wget https://oss.sonatype.org/service/local/repositories/releases/content/com/jpmorgan/quorum/tessera-app/0.10.4/tessera-app-0.10.4-app.jar

Alternatively, you can also download the installation file manually at https://github.com/jpmorganchase/tessera/releases
Next, go to the mounted data disk directory, make directory for 4 nodes.

Then, move the Tessera software to the /mnt path, then execute the following command to create the key sets.
java -jar tessera-app-0.10.4-app.jar -keygen -filename t1
java -jar tessera-app-0.10.4-app.jar -keygen -filename t2

Now, move the key files to the node1t and node2t folder:

Create a file call config.json, then copy and paste the follow content to the config file:
{
"useWhiteList": false,
"jdbc": {
"username": "sa",
"password": "",
"url": "jdbc:h2:/mnt/node1t/db;MODE=Oracle;TRACE_LEVEL_SYSTEM_OUT=0",
"autoCreateTables": true
},
"serverConfigs":[
{
"app":"ThirdParty",
"enabled": true,
"serverAddress": "http://localhost:9081",
"communicationType" : "REST"
},
{
"app":"Q2T",
"enabled": true,
"serverAddress":"unix:/mnt/node1t/tm.ipc",
"communicationType" : "REST"
},
{
"app":"P2P",
"enabled": true,
"serverAddress":"http://localhost:9001",
"sslConfig": {
"tls": "OFF"
},
"communicationType" : "REST"
}
],
"peer": [
{
"url": "http://localhost:9001"
},
{
"url": "http://localhost:9002"
},
{
"url": "http://localhost:9003"
},
{
"url": "http://localhost:9004"
}
],
"keys": {
"passwords": [],
"keyData": [
{
"privateKeyPath": "/mnt/node1t/t1.key",
"publicKeyPath": "/mnt/node1t/t1.pub"
}
]
},
"alwaysSendTo": []
}
Save the file, then exit. Then, execute the following command to kick start the Tessera process:
java -jar ../tessera-app-0.10.4-app.jar -configfile config.json >> tessera.log 2>&1 &
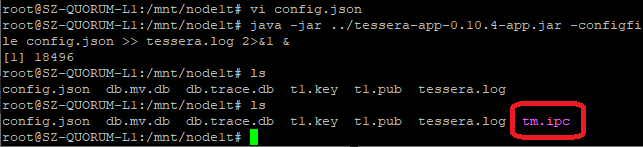
When you see the tm.ipc file is exist in the node1t folder, it indicate that you have done it correctly and the Tessera process is running now. If you do not see, not to worry, wait for a few more seconds, or check the tessera.log file to see what went wrong.
Repeat the above config file creation step for the node2t, refer to the color highlighted value that need to be modified accordingly to the right node config.
Now, go to your data disk mount directory which is located at /mnt, open the file startnode1.sh with file editor, then modify the PRIVATE_CONFIG value to the Tessera ipc file path.

To:

After modifying and saving the startnode1.sh and startnode2.sh, straight away execute both scripts.
Testing
First, let's get Node 2 public key because it is required for setting up private smart contract by executing the following script at the /mnt/node2t:
cat t2.pubYou will get the public key value which look like this:

Then, go to the /mnt directory, create a test sample smart contract called private-contract.js, then copy and paste the following content to the new file, but remember to change the value for privateFor to your node 2 Tessera public key which you got it from previous step:
a = eth.accounts[0]
web3.eth.defaultAccount = a;
// abi and bytecode generated from simplestorage.sol:
// > solcjs --bin --abi simplestorage.sol
var abi = [{"constant":true,"inputs":[],"name":"storedData","outputs":[{"name":"","type":"uint256"}],"payable":false,"type":"function"},{"constant":false,"inputs":[{"name":"x","type":"uint256"}],"name":"set","outputs":[],"payable":false,"type":"function"},{"constant":true,"inputs":[],"name":"get","outputs":[{"name":"retVal","type":"uint256"}],"payable":false,"type":"function"},{"inputs":[{"name":"initVal","type":"uint256"}],"payable":false,"type":"constructor"}];
var bytecode = "0x6060604052341561000f57600080fd5b604051602080610149833981016040528080519060200190919050505b806000819055505b505b610104806100456000396000f30060606040526000357c0100000000000000000000000000000000000000000000000000000000900463ffffffff1680632a1afcd914605157806360fe47b11460775780636d4ce63c146097575b600080fd5b3415605b57600080fd5b606160bd565b6040518082815260200191505060405180910390f35b3415608157600080fd5b6095600480803590602001909190505060c3565b005b341560a157600080fd5b60a760ce565b6040518082815260200191505060405180910390f35b60005481565b806000819055505b50565b6000805490505b905600a165627a7a72305820d5851baab720bba574474de3d09dbeaabc674a15f4dd93b974908476542c23f00029";
var simpleContract = web3.eth.contract(abi);
var simple = simpleContract.new(42, {from:web3.eth.accounts[0], data: bytecode, gas: 0x47b760, privateFor: ["83vHGB2IGbmObH8Dl/tHWadA5KUQ3u7DxIs2byOuiQU="]}, function(e, contract) {
if (e) {
console.log("err creating contract", e);
} else {
if (!contract.address) {
console.log("Contract transaction send: TransactionHash: " + contract.transactionHash + " waiting to be mined...");
} else {
console.log("Contract mined! Address: " + contract.address);
console.log(contract);
}
}
});
Once done, save and exit from the file editor.
Now, attach geth to the Node 1 by executing the following command:
geth attach node1/geth.ipcThen, before we could deploy smart contract, we need to unlock our account first by issuing the following geth command:
personal.unlockAccount(eth.accounts[0])You will be prompted to key in the passphrase of your account which you had setup following my previous post.
Once you have unlocked your account, load the private contract script by issuing following geth command:
loadScript("private-contract.js")You will notice the returned transaction hashed and mined contract address which indicate the success of deploying smart contract.

Up to this stage, you are considered as successfully setup Tessera in your Quorum. However, we need a block explorer to further visualize how your blockchain work. In my next post, I will share how to setup a Quorum block explorer. Stay tuned!


Discover expert guides, news, and articles on Blockchain wallets and cryptocurrency. How to Withdraw Funds from Strike App?, How to Transfer Money from Strike to Cash App Visit us
ReplyDelete“How To Open a Savings Account on Coinbase” - Opening a savings account on Coinbase is a simple process to earn interest on your cryptocurrency. First, create and verify your Coinbase account by providing personal details and completing the identity verification process. Then, deposit funds into your account by linking a bank account or transferring crypto. Navigate to the “Earn” or “Savings” section on Coinbase, where you’ll find available savings options and their interest rates.
ReplyDeleteLearn everything about Crypto com response time for customer support, transactions, and technical issues. Discover expert tips to get faster help and avoid delays. What Is Crypto.com Response Time, Crypto.com Response Time: What You Need to Know Read blog
ReplyDelete